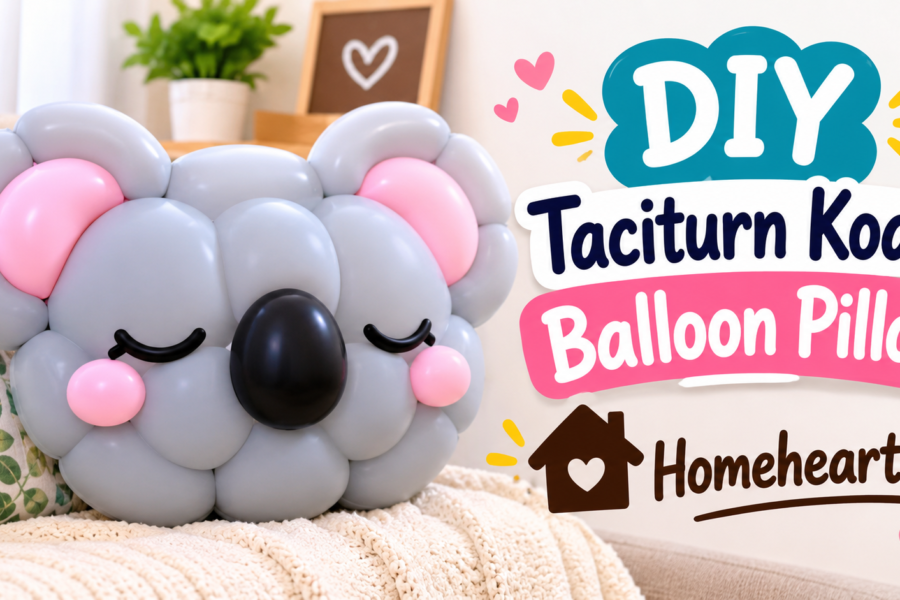
A koala that looks like it has run out of small talk, built with the tight, glossy roundness of a foil balloon. That is the idea behind a diy taciturn koala balloon pillow homehearted project, and this guide gives you everything needed to make one: exact cut sizes, a stuffing method that avoids lumps, and fixes for the mistakes beginners usually make.
Quick Project Facts
| Detail | Estimate |
|---|---|
| Finished size | About 16 inches wide and 3.5 inches deep |
| Skill level | Beginner to intermediate sewing |
| Time | 3 to 4 hours (sewing), 1 to 2 hours (no-sew) |
| Cost | Roughly $20 to $35 depending on fabric |
| Machine needed | Yes for the main method, no for the no-sew version |
| Washable | Spot clean or gentle cycle, depending on fabric |
Costs and times are estimates. Fabric prices and your sewing speed will change them.
What the Name Means (and What It Doesn’t)
The phrase “taciturn koala balloon pillow homehearted” reads like a product listing title. I searched for an official product page under that name and could not find a clear one. So this tutorial treats the phrase as a style description rather than a copy of a specific item. If you saw a listing under that name, this guide will get you a similar look, but it is not an exact replica of that product.
Here is how the style breaks down:
- Taciturn: a calm, flat expression. Small eyes set wide apart, no smile, a straight or barely visible mouth.
- Koala: a gray round head, two large fluffy ears, and a big dark oval nose.
- Balloon: puffy, tight, and rounded at the edges, not flat like a standard cushion.
- Homehearted: a soft, home-decor feel with neutral colors that suit a couch, nursery, or reading nook.
Where the Balloon Shape Comes From
Most koala pillows are flat. A balloon pillow is different because the edges curve outward instead of pinching at a seam. Studio DIY’s balloon letter pillows show one way to get this: sewing an extra quarter-inch outer seam around the outline so the pillow looks more like a balloon. That creates a pinched, twisted-balloon effect.
For a koala head, a second method works better: a gusset, which is a strip of fabric sewn between the front and back panels. The gusset gives the pillow real depth, so it reads as a puffed object instead of a flat disc. This tutorial uses the gusset for the head and the outline seam for the ears.
Materials and Tools
| Item | Amount | Notes |
|---|---|---|
| Gray minky or soft plush fabric | 3/4 yard | Main head, gusset, and outer ears |
| Light pink or cream fabric | 1/4 yard | Inner ears |
| Dark charcoal or black felt | One 9 x 12 inch sheet | Nose |
| Black embroidery floss | 1 skein | Eyes and mouth, safest for kids |
| Polyester fiberfill | About 12 ounces | Buy 16 ounces to be safe |
| Thread, matching gray | 1 spool | Polyester works best |
| Ball point needle, size 90/14 | 1 | Prevents skipped stitches on stretchy fabric |
| Sewing clips | 20 or so | Pins slip in minky |
| Paper for pattern | 17 x 17 inch piece | Butcher paper or taped printer paper |
| Fabric marker or chalk | 1 | Washable |
| Hand needle | 1 | For closing the opening |
Optional but helpful:
- A walking foot for your machine
- A chopstick or wooden spoon handle for pushing stuffing into corners
- A small pet slicker brush to fluff seams on minky
Fabric Comparison: Which One Gives the Best Balloon Look?
I did not run lab tests on these. This comparison reflects how each fabric type generally behaves, so use it as a guide and not as measured data.
| Fabric | Puffy look | Ease of sewing | Shine | Best for |
|---|---|---|---|---|
| Minky (short pile) | Good | Medium, it shifts | Low | Most realistic koala, kid-friendly |
| Polyester satin | Excellent | Hard, it frays and slips | High | A foil-balloon look |
| Velvet or velour | Good | Medium | Medium | A premium decor look |
| Quilting cotton | Fair | Easy | Low | Beginners, but less plush |
| Faux fur (short) | Good | Hard, it sheds | None | A fluffy, realistic koala |
If you want the most “balloon” feel, satin gives the shine but takes more patience. For your first attempt, minky is a safer choice.
Pattern Measurements
Draw these shapes on paper and cut them out. All sizes include a 1/2 inch seam allowance.
| Piece | Shape and size | Quantity | Fabric |
|---|---|---|---|
| Head front | 17 inch circle | 1 | Gray |
| Head back | 17 inch circle | 1 | Gray |
| Gusset strip | 4 x 52 inches (piece from two strips if needed) | 1 | Gray |
| Outer ear | 6 inch circle | 2 | Gray |
| Back of ear | 6 inch circle | 2 | Gray |
| Inner ear | 4 inch circle | 2 | Pink or cream |
| Nose | Oval, 3.5 x 5.5 inches | 1 | Felt |
How to draw a 17 inch circle without a compass: tie a string to a pencil, hold the other end with a pin at the center of your paper, and keep the string at 8.5 inches.
Why 52 inches for the gusset: a 16 inch finished circle has a circumference of about 50 inches. The extra length covers the seam allowance at the joint.
Step-by-Step Sewing Instructions
Step 1: Cut and Mark
Lay your fabric with the stretch running side to side. Cut all pieces. Fold the head circles and the gusset in half and then in quarters, and mark each quarter point with a small snip or a dot of chalk. These marks keep the gusset evenly spaced around the circle.
Step 2: Make the Face
Pin the felt nose oval to the lower center of the head front. Place it a bit below the middle of the circle, since koalas have low, wide noses. Sew it down with a small whip stitch or a narrow machine zigzag.
For the eyes, mark two dots about 5 inches apart and about 1.5 inches above the nose’s top edge. Embroider them with a satin stitch or French knots. For the taciturn look, keep the eyes small and the mouth to a short straight line, or skip the mouth entirely.
Step 3: Make the Ears
Place an inner ear circle in the center of one outer ear circle and sew it down with a narrow zigzag. Pair that with a back-of-ear circle, right sides together, and sew around the edge with a 1/2 inch seam, leaving a 2 inch gap. Turn it right side out, press lightly (low heat on minky), and add a handful of fiberfill. Make two ears.
For the balloon effect on the ears, topstitch a 1/4 inch outer seam around the edge. This mimics the pinch you see on balloon letter pillows.
Step 4: Place the Ears
Fold the open edge of each ear to form a small pleat. Pin or clip the ears to the top of the head front, facing inward toward the face, so they sit between the layers. Space them about 11 inches apart at the outer edges. Sew over them with a basting stitch to keep them in place.
Step 5: Make the Gusset Ring
Sew the two short ends of the gusset strip together with a 1/2 inch seam to make a ring. Press the seam open.
Step 6: Attach the Gusset to the Front
Line up the gusset’s quarter marks with the head front’s quarter marks, right sides together. Clip every few inches. Sew with a 1/2 inch seam, going slowly and keeping the fabric flat. The ears should be sandwiched inside.
Step 7: Attach the Back
Repeat with the back circle, but leave a 5 inch opening along one section. This is where you turn and stuff the pillow. Reinforce the start and end of the opening with a backstitch.
Step 8: Turn and Check
Turn the pillow right side out through the opening. Push out the edges with a chopstick. Check that the ears are pointing the right way and the seam is even all around.
Step 9: Stuff in Layers
Tear fiberfill into pieces about the size of golf balls. Fill the edges first, then the center. Stop when the pillow is firm but still has a little give. Overfilling creates a hard, lumpy look, and underfilling makes the face wrinkle.
Step 10: Close the Opening
Use a ladder stitch (invisible stitch) with a hand needle and matching thread. Pull the stitches snug, then knot and bury the thread inside the pillow.
Getting the Balloon Look Right
The difference between a flat koala pillow and a balloon one comes down to a few choices:
- Use the gusset. A pillow without depth cannot look puffy.
- Stuff firmly. Balloons are tight. Aim for smooth, slightly taut sides.
- Fill the edges first. The outer rim defines the balloon shape.
- Keep seams even. Wobbly seams show on shiny fabric.
- Choose a stretchy fabric for the front. Stretch helps the face look rounded rather than flat.
- Never use a real balloon inside. It will deflate, can pop, and is a safety hazard for kids.
Method B: No-Sew Version
If you have no sewing machine, use a plain round pillow as a base.
- Buy a round gray pillow, about 16 inches wide.
- Cut felt circles for the ears and glue them to the top edge with fabric glue.
- Cut a felt oval for the nose and glue it in place.
- Add small black felt circles for eyes.
- Let the glue dry for the time listed on the label before handling.
This version is quicker but less balloon-like, because the shape comes from the pillow you bought. It also should not be washed hard, since the felt may peel.
Method C: Crochet Version
Crochet gives a different texture. EyeLoveKnots has a free pattern, and it takes around 2 to 3 hours to make and measures about 11 inches when finished. That is smaller than the sewn version here. To get a more balloon-like result in crochet, use a smaller hook than the yarn label suggests so the stitches are tight, and stuff the piece firmly.
| Factor | Sewn | No-sew | Crochet |
|---|---|---|---|
| Balloon shape | Best | Fair | Good with tight stitches |
| Time | 3 to 4 hours | 1 to 2 hours | 2 to 3 hours |
| Tools | Sewing machine | Glue, scissors | Hook, yarn |
| Washability | Good | Poor | Good |
| Kid-safe | Yes with embroidered eyes | Depends on glue | Yes with embroidered eyes |
Troubleshooting Common Problems
| Problem | Likely cause | Fix |
|---|---|---|
| Lumpy surface | Large clumps of stuffing | Pull stuffing apart and refill in smaller pieces |
| Face looks wrinkled | Too little stuffing | Add more through the opening |
| Seam puckers | Fabric stretched while sewing | Use a walking foot and sew slower |
| Gusset does not match the circle | No quarter marks | Mark and match quarters before sewing |
| Ears flop to one side | Uneven stuffing or placement | Stuff firmer and re-measure the spacing |
| Skipped stitches | Wrong needle | Switch to a ball point 90/14 |
| Shiny fabric slips | Slippery material | Use clips and sew with tissue paper under the fabric |
DIY vs. Buying: Is It Worth Making Your Own?
Store-bought koala pillows vary a lot. A single Etsy search page shows koala pillows and plush ranging from about $9.99 up to $79. Making your own costs about $20 to $35 in materials, though you will have leftover fabric.
| Factor | DIY | Store-bought |
|---|---|---|
| Cost | About $20 to $35 | $10 to $80 or more |
| Customization | Full control of size, color, face | Limited |
| Time | 3 to 4 hours | None |
| Quality control | You decide | Varies by seller |
| Gift value | High, because it is handmade | Depends on the item |
Making it yourself makes the most sense if you want a specific size or color, or a unique expression.
Safety and Care
- For kids under 3: embroider the eyes and nose instead of using plastic safety eyes or glued parts.
- Stuffing: use new, clean polyester fiberfill and close the opening securely.
- Washing: spot clean when you can. For machine washing, use a gentle cycle in a pillowcase and air dry. Avoid high heat on minky.
- Storage: keep away from direct sun, which can fade gray fabric.
Ways to Use Your Finished Pillow
- A reading nook accent
- A nursery decoration
- A birthday gift for a koala lover
- A photo prop for baby announcements
- Safari or Australian-themed party decor
Frequently Asked Questions
What is a diy taciturn koala balloon pillow homehearted?
It is a handmade koala pillow with a calm expression and a puffy balloon-like shape. The name resembles a product listing, so this guide treats it as a style rather than a specific brand’s design.
How long does it take to make this pillow?
Sewing takes about 3 to 4 hours for a beginner. The no-sew version takes about 1 to 2 hours.
What fabric works best for the balloon look?
Minky is the easiest and most forgiving. Polyester satin gives the shiniest balloon effect but is harder to sew.
How much stuffing do I need?
About 12 ounces of polyester fiberfill for the 16 inch size. Buy a little extra so you can adjust firmness.
Can I make it without a sewing machine?
Yes. Use a plain round pillow as a base and attach felt ears, nose, and eyes with fabric glue.
Is it safe for babies and toddlers?
Embroider all facial features and close the opening with strong stitches. Avoid small glued or plastic parts for children under 3.
Can I wash it?
Sewn versions can usually go on a gentle cycle in a pillowcase and be air dried. Glued no-sew versions should only be spot cleaned.
Final Thoughts
A diy taciturn koala balloon pillow homehearted project comes down to three decisions: a gusset for depth, firm layered stuffing for the tight balloon shape, and a calm, minimal face. Cut accurately, mark your quarters, and take your time with the stuffing. Once you have made one, changing the size, color, or fabric to get a different look is easy.